
The first step is to enter your current passwords into No/Pass.
This takes you to a page with a default name selected for you to replace with the desired name.
A password has also been generated using the default settings of length=16 and all 95 supported characters allowed. Click the toggle buttons on the right to change which characters are allowed, or drag the slider to change the password length. Click on the password then click the two gears icon at the top left of the window to regenerate a password using the new rules. You may also edit the password manually or paste an existing one from another location.
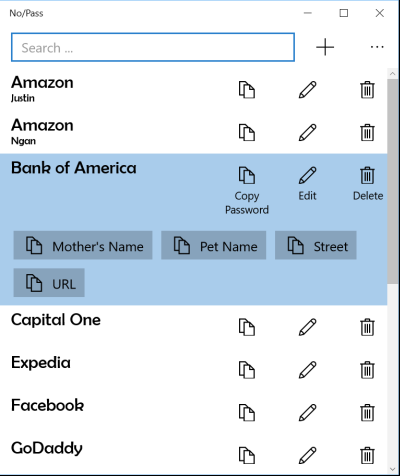
Often you’ll leave the other fields blank unless you need to paste their values from the clipboard. The user field can also be used to differentiate between two accounts with the same name such as the two Amazon accounts in the sample screenshots.
You may enter as many name/value pairs as you like. The name is optional, but if entered then it will be used as the label of the button on the main page which copies the value to the clipboard.

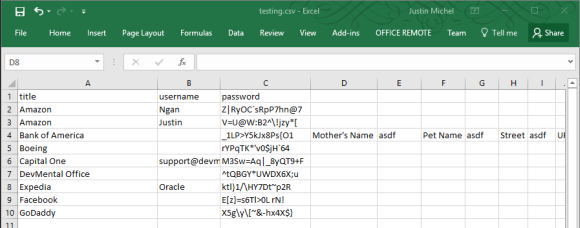
You can enter your passwords manually as above, but if you have many passwords, you may find it easier to instead create a simple csv file using Excel.
To make it more convenient to use No/Pass you may want to pin it to your start menu and task bar. Once pinned to your start menu you can also drag it onto your desktop, and assign a keyboard shortcut to the icon.


To enter a password, just open No/Pass, type a few letters of the name to filter the list, use the arrow keys to highlight the one you want, then press <enter> to place the password on the clipboard for 30 seconds. Then paste the password where required. Your web browser will usually offer to remember the password in the future, and we recommend doing so. If the site is important like a bank account, then you should enable 2-factor authentication using the bank web site security settings.
If you have assigned extra name/value pairs as with this bank account, then you can click the buttons to place the corresponding value on the clipboard.
Use 2-factor authentication for important things like your email and bank accounts. This provides additional security where necessary. Follow the instructions from your bank and email provider. They will typically require you to enter a short 6-digit additional PIN whenever you log in from a new location or device. You get the PIN either via text message or using an authenticator app.
Your most important password is your email, because with access to your email someone can usually reset or change all of your other passwords including bank accounts. For many, this email is tied to a Microsoft, Apple, or Google account which means that that single password is even more important, because it is used to protect all of your many assets with that vendor.
Set up biometric authentication on your computer. This is usually available as a fingerprint reader on laptops, and it makes it even more convenient than entering a PIN. For added security without any additional hassle be sure to use a long PIN on such devices, because you’ll never need to enter it. You should store this pin in No/Pass just in case something goes wrong with the biometric reader.
Lock your computer when you’re away in an unsecure location such as a coffee shop or even at work. This is even more important when using No/Pass, because now your passwords are all stored in one convenient location on your computer. We force you to re-authenticate your fingerprint, pin, or password when exporting so that if you do forget then someone can’t export all of your passwords quickly using No/Pass.
Use encryption on your storage devices that could conceivably be lost or stolen. This is often easy, because many solid state hard drives now use hardware encryption by default. You can also turn on encryption of thumb drives, and even set it up so that you don’t have to enter a password when accessing them from your usual computers.
No/Pass is built around Windows features that automatically synchronize your passwords among your trusted machines. This happens as long as 1) You sign in using a Microsoft account instead of a Local account, and 2) The machine is a trusted device.
Follow these steps:
1. Open the Settings App
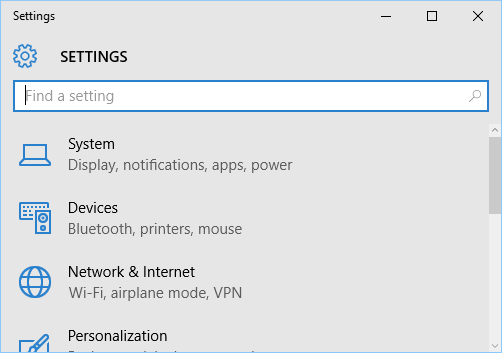
2. Click on Accounts
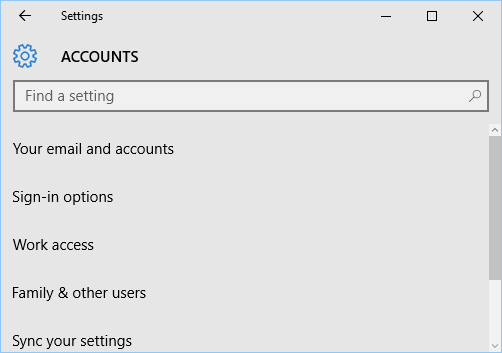
3. Click on “Your email and accounts”. Also notice the “Sync your settings” option, as that’s something you can check later to ensure all your settings and passwords synchronization options are enabled which is the default.
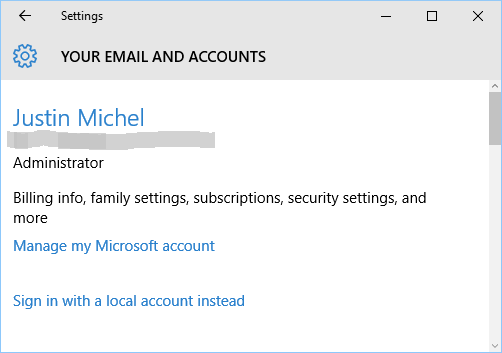
4. If your device is trusted (like mine) then it will look like the above with a link to manage your Microsoft account. If instead, it says “Sign in with a Microsoft Account instead” then click that option to sign in with a Microsoft account. It also may say “You need to verify your identity” with a link to do so. Once you’ve verified your identity following the prompts and possibly using 2-factor authentication configured for your account, then this device becomes trusted and your passwords will show up in No/Pass.
We’ve found that the easiest way to do this is to save your Microsoft account password to a text file on a thumb drive temporarily. Sign in to your new machine with a local administrator account that you configure during installation. You use a local administrator account, because there is no way to access the password to paste it into the field during setup. According to the documentation on Microsoft’s site you must install No/Pass while logged in to a Microsoft account for it to automatically synchronize settings, but in our experience it seems to work even if you install No/Pass first then log-in to the Microsoft account later. Therefore, an alternative is to export from No/Pass to your thumb drive, install No/Pass on the new machine, then import your passwords from the thumb drive, and finally switch to the synchronized Microsoft account to enable synchronization in the future.
We may add support for this option in the future as we bring No/Pass to additional platforms. For now, we felt relying on the built-in Windows 10 support for synchronizing your settings would be the most convenient thing for our users, and for most would just work automatically without any configuration needed.
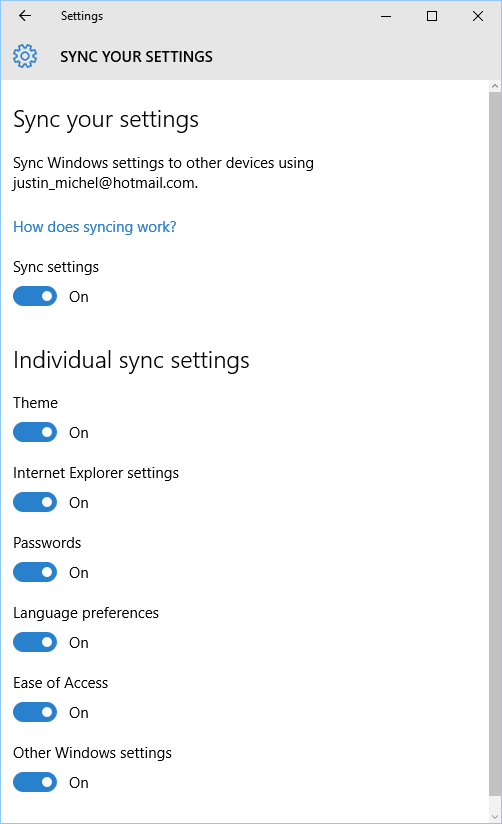
There are two known reasons why this might happen even for trusted devices. First, you may be signing in to a work computer where your system administrators have disabled the option to link your work and personal Microsoft accounts. In that case you may want to manually export a subset of your personal passwords using our text format. You can delete information from the file that you don’t feel should show up at work, and then import the edited file into No/Pass at work as long as this doesn’t violate your company policies. Another thing that can happen is that you may have inadvertently disabled the synchronization on your machine. On the following screen No/Pass needs “Sync settings”, “Passwords”, and “Other Windows settings” to be enabled.
No. DevMental Software does not store any information whatsoever specific to our users. In particular, your passwords are not known to us, so we can’t recover them. All passwords are stored as encrypted roaming settings using standard Microsoft Windows features. We recommend that you periodically use our Export feature to back up your passwords to a safe location.
Yes, because we use the standard Windows roaming settings feature we are limited by a quota that Microsoft enforces, but we believe there is sufficient storage to handle storing all passwords for a user. As of 5/8/2016 that limit is 100K. You may check the About page to see approximately what percentage of space is currently in use. If you have many passwords and they suddenly stop synchronizing, then this might be worth checking. Once you remove enough information (such as old passwords) so that the total settings size is < 100K then synchronization will resume. If this becomes a frequent problem, then we’ll reevaluate the way we synchronize passwords.
Yes. We’re currently working on versions of the app for these devices. It’s currently unclear how best to synchronize the passwords between the different platforms, and we’re debating how to handle this issue. We may require use of OneDrive, DropBox, or some similar service like many other apps.